Reinforce Moulton series 1 Forks
Series 1 Rear Forks – A Cracking Design
Your classic Moulton bicycle has been creaking and groaning for a while. Suspiciously, it has now become silent for a couple of weeks. Problem solved? One day, you sense an increasing lack of frame firmness when cornering, and force yourself to have a closer look. An evil, smiling crack has appeared around the circumference of one rear fork blade.
 This is the worst case and, thankfully, total failure does not happen rapidly. Usually, you discover the beginning of small cracks on the forks when mending a rear tyre puncture. Found them? Heed this warning and do not ignore even the smallest fracture. The stress at a crack tip is infinite.
Let’s tackle the Series One’s main failing in an open and positive way. Some people ‘in-the-know’ prefer to under-estimate this problem. This view must be counter-productive if its aim is to minimise negative feeling about early Moultons. Anybody new to the Series One will not know about the high potential for rear fork failure and be severely disappointed when it happens to them. They will not look out for the initiation of cracking and may well regard the whole bike as scrap, or over-stressed, when their forks fail. And slowly but surely, maybe after even forty years use, cracks can eventually develop.
The forks in the top photograph are the type made by mig-welding, the typical construction method of the car industry. As you can see, the weld itself is perfectly intact, but the steel around it has been weakened in a high-stress area, initiating the crack.
 Here's a pair of earlier rear forks, almost certainly made at the smaller Bradford-on-Avon factory. They are beautifully brazed together, no welding anywhere, and in this case the metal of the fork blades is still absolutely fine. However, look closely and you will see that the bronze has cracked through the centre of the joint.
One can only imagine the dawning nightmare at the Moulton factory as reports started to come in of rear fork failure. They had already experienced failure on the front forks, although this had been no fault of the design or the factory- it was under-brazing by outsourced contractors. Also, a weak area in the frame had been exposed by testing in Iceland. This was cured by the fitting of a lower stay with a 'jack' support from the main beam to the tail tube. However, these sort of teething troubles are not unknown in very innovative products. Would you regard the VW transporter van as a dud design? The first prototype vans readily chewed up their over-loaded Beetle derived chassis and spat them out. In that case, development involved making weak areas stronger until the stress could be carried everywhere. Likewise, Dr. Moulton created the indestructible Series Two forks.
How to check the forks for cracks
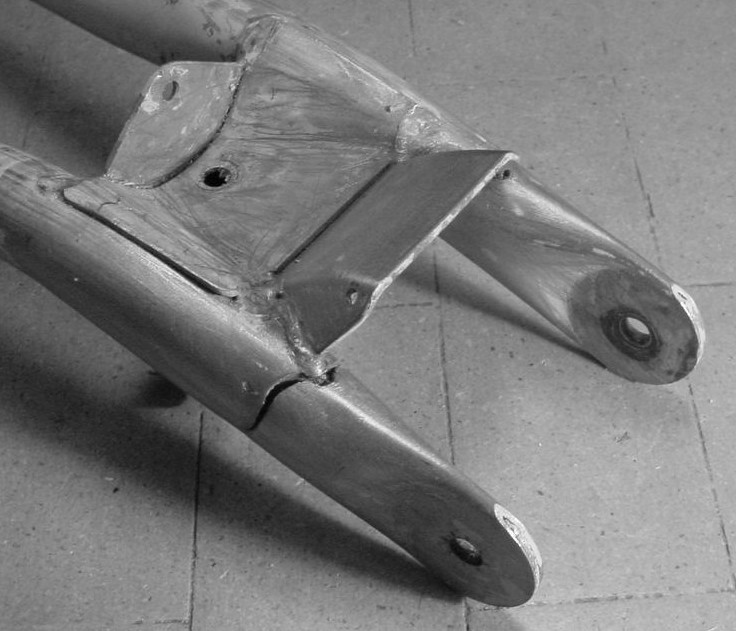
If you are new to the Classic Moulton, and have not examined the rear forks closely, where do you start to look? Just to clarify, if the forks are slender, curved and tapering, with brazed-in wheel drop-outs, they are Series One. Cracks always start in the same place, at the junction between the crescent cup and the round fork blade on the underside of the forks. Looking from the side, you can see that the angle between the fork blade and the crescent cup is acute, like ‘Pacman’s’ mouth. The notch at the back is the critical region.
 Now, let’s look at a failed pair. These show the typical fractures, in an advanced stage. Note how the crack will happily travel all around the tube. There are cracks on both blades (typical) and little hope of making this pair safe again. This type of fork is a later Series One, which was manufactured with CO2 arc welding at Kirkby. The press-formed ‘closing’ plate, which bridges the fork tubes, is merely tacked by welding at the corners. Unfortunately, this does nothing for structural rigidity or stress dispersion. Further, the enclosed space creates an undesirable rust-trap close to the critical joints. Jack Lauterwasser must have appreciated this, as he brazed around the entire periphery of his closing plates on the superb S models, forming a much more rigid, sealed box.
Many of the forks that remain in service are early units brazed at Bradford-on-Avon. They tend to fail very gradually, presumably because the heat treatment during brazing is much more favourable to steel toughness than the white-hot heat of arc welding. In Kirkby forks, the crescent cup often manages to rip local areas of the fork tubing like tinfoil.
Why do the forks crack?
It is interesting that the rear fork blades never crack at random places along their length. It is not that the tubing is in itself not up to the job. (As an aside, Moulton Mini rear forks never seem to crack anywhere; they just bend if over-loaded.) There are two main systems of forces acting on a very small area of each fork blade, where it is joined to the rubber crescent cup. The first is a cantilever type force. When weight is applied to the bike, the forks swivel upward and the cup pushes down on them. The edges of the cup are sharp and so the force acts in a concentrated region, giving a high stress zone.
The second type of stress is torsional, that is, a twisting stress. There are two fork blades fixed horizontally to the bike at one end, with the wheel bolted between them at the other. Every pedal revolution pushes sideways through the bicycle frame down to the wheel. This puts a sideways force on the wheel at the tyre, which tries to twist the forks.
Go around a corner and centrifugal force also reacts through the wheel, again to try and twist the forks. If you look at your forks, you’ll see the plate on the top (with the brake mounting) is bent over at right angles and continues vertically down between the fork blades. This plate does almost nothing to prevent the forks twisting. Forks never ever crack at the vertical brazed joints of the plate.
Pull the top of the wheel from side to side; feels quite flexible, doesn’t it? The only part of the forks that provide the blades with their resistance to torsion is the place where they are joined to the rubber crescent cup. Unhappily, this is the very same region where the cantilevered forces act which I described before. When you press on the pedal and so load the bike, you are simultaneously giving the forks a good twist. Millions of cycles of co-ordinated loading, twisting and relaxing with most of the stress concentrated in a minute region; no wonder they eventually give up the ghost.
Brazed repairs
In 2001 I wanted to develop a good system of strengthening and repair. I was working as a technician in a school Design and Technology department and had access to good brazing gear for the first time. The following is an account written for the Moulton Club magazine of my brazing repair method.
 It’s easy enough to relieve the critical stress notch. I cut out triangles of steel of 4mm thickness and file the edges to fit the profile of the fork blades underside. Then each triangle is mig welded to the front of the crescent cup on the outside. Once the welded joints have been cleaned up, the triangle can be brazed into place along the edges on both sides, using plenty of bronze filler rod. At the same time, all other existing joints are braze-reinforced. Initial mig welding allows the forks to be moved about during brazing without the triangles falling off. Note that it is still possible, following repair, to pop rivet the rubber crescent to the cup as before.
 Now we have to do something to prevent the forks twisting. Firstly, I make a hexagonal plate having two shallow folds, which fits into the square aperture underneath the forks between the blades. A hexagon fitting into a square? This is because of the folded shape of the hexagonal plate and the corresponding angles of the cup and brake plate, easier to illustrate than describe. The hexagon is made from 1.5mm steel sheet and has a slot cut to allow access to the brake bolt from underneath. You can also get a modeller’s paintbrush in there to all the inner surfaces. Any water ingress can drain out of the hole, away from the joints due to the angles of the plate. All edges of the hexagon are brazed to the fork assembly, forming a rigid box.
 Next, I make a cover plate to fit around the crescent cup on the underside of the forks, also from 1.5mm thick steel sheet. This lies flat on the underside of the forks like the Series Two baseplate, but it only reaches as far back as the edge of the access slot on the new hexagonal piece. Both new parts contact one another. Brazing fastens the baseplate to the fork tubes, crescent and hexagonal plate, with plenty of bronze filler rod all around the edges. The photographs show that my technique is more braze-welding than brazing, due to lack of experience.
From the rear, you can see that the new components form a structure that has triangular prisms from the fork tubes pointing into the centre. It’s a bit like an inverted bridge. With this rigid strengthening behind the crescent cup, and the ‘Pacman’ triangles in front, the concentrated stress zone has been effectively distributed. What’s more, the repair is almost entirely hidden beneath the bike when it is standing upright.
MIG-welded "quick" repairs
The above method for strengthening forks was written in 2001 when I had access to excellent brazing equipment and a superb workshop. It was an elaborate repair technique needing a fair amount of fettling, and although an ideal, I later wondered if I could carry out simpler strengthening using a common mig welder. The danger with bicycle tubing is that it is thin, and most mig welders will melt a hole right through. However, if you use a kind of "stitch" technique, using short bursts of tack welding one after another, the heat does not get the opportunity to build up sufficiently to ruin your forks. The Moulton rear forks are actually double thickness i.e. one tube inside another. The type of welder I used was a Cebora Turbo 130; an old but quality piece of kit. The mig wire has to be 0.6mm gauge as this transfers a lot less heat energy than 0.8mm gauge.
| I tried it and the result is shown on the left. The first thing I did was to weld in a small bar of steel to the back of the crescent cup, connecting to the fork blades on each side. This helps to prevent twisting. In fact the crescent cup is made from steel around 2mm thick so you can run a seam along this joint with no worries of melting through. | 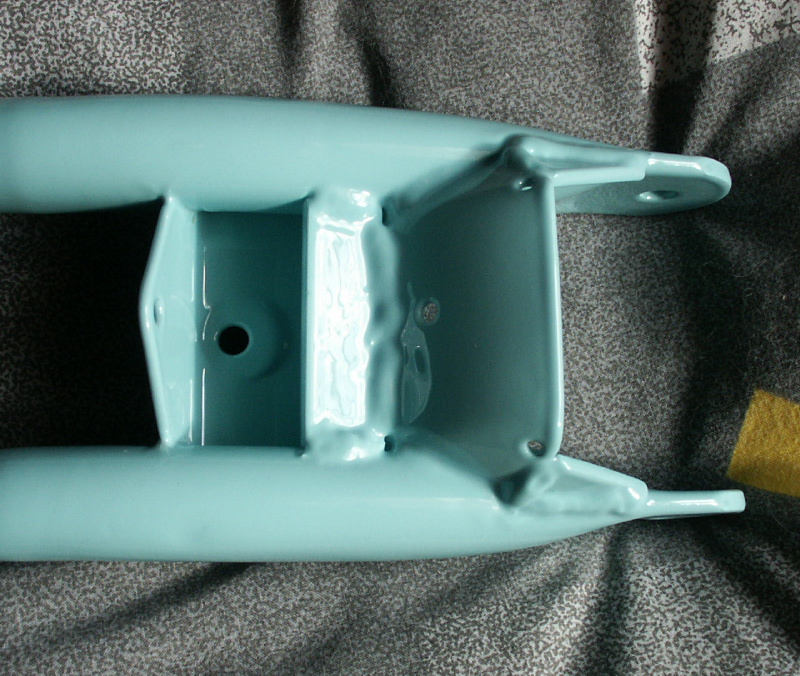 |
| Next I cut out two small triangles from a piece of 3mm thick steel and filed them to shape to fit into the Pacman notches. This is really where the forks are most likely to crack. Using 3mm thick mild steel helps to absorb much of the heat from the welding torch. Clamping the pieces to the forks in the correct place is one of the trickiest jobs. I generally hold the triangle in a pair of pliers and do a quick tack weld to the crescent cup. | 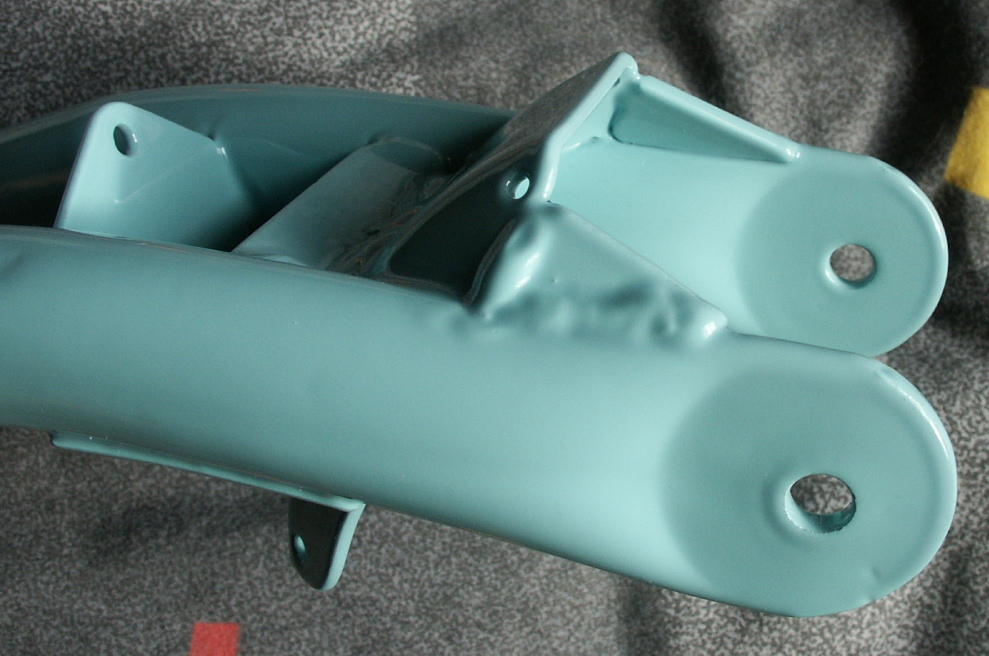 |
| The weld may look slightly lumpy but this is partly due to the technique of applying short bursts of weld. I don't really believe in grinding down welds unnecessarily. In this case, when the bike is stood on it's wheels you can barely see the plates, so I'd rather retain strength at the joint. On a subsequent pair of forks I did actually weld the inside as well as the outside of the triangles, then used an angle grinder to carefully grind the outer welds flush. This repair looked perfect. | 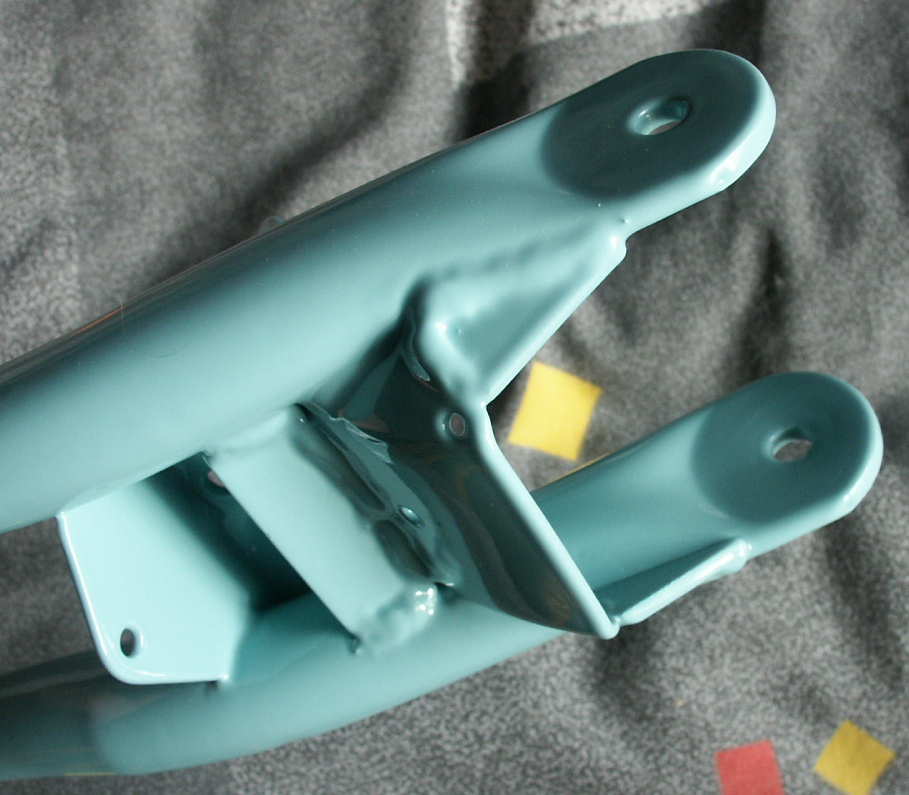 |
To date I've reinforced around 8 pairs of forks in this way and none have experienced any fractures. The set that are shown on my fork fitting page here even had a small crack through a blade that was welded up before fitting the triangle. Note that if you are performing a similar welded repair to a set of brazed rear forks, you will need to file off all the bronze in the region of the new welds. Bronze does not weld successfully and is very unhappy at being mixed with molten steel.
Don't worry!
Your cherished Moulton bicycle may well already be suffering the beginnings of rear fork failure. There is no reason to worry or write the whole bike off as a bad design. Series One’s are excellent machines, for so many reasons. The earlier you detect the problem, if there is one, the more chance you will have of saving your original forks.