Fichtel & Sachs Duomatic Re-assembly
Inspection and assessment
Refer to the final photograph in the dismantling instructions to see how all the parts should look cleaned up. This hub came from (and was returned to) a Moulton Stowaway from 1965 and, once cleaned, all of the parts inside looked as fresh as the day they came out of the factory. Even the ball bearings were shiny and perfect. The old Torpedo Duomatic was a great design, made to high tolerance from first class materials. Furthermore, there was not much to go wrong. There are no moving clutches or cable adjustment issues as with Sturmey hubs.
Examine the pawls for chipped ends. Check the bearings and renew if there are any signs of appreciable wear. The ball rings are shared with the Sachs Torpedo three speed, of which a huge number were made. Spares might be found in German online cycle shops. You may be able to put new balls into the existing retaining rings.
Clean off all the old grease thoroughly. This can be done with paraffin or Jizer, which is a dedicated degreaser. However, parts cleaned in Jizer must be washed in hot water and detergent, rinsed and dried. Note that the design of the pawls on Sachs hubs makes them much more prone to sticking against the carrier than Sturmey hubs. I have also seen weak circular springs that do not allow the pawls to engage with enough force. Bending them into a slight ellipse with the narrow diameter pressing on the pawls can restore them.
On the old Duomatic (1964-1970), the brake band and shell was lubricated by Sachs Vaseline based grease. The hub gear parts are lubricated by oil and the ball bearings at the other end again with grease. Sachs also said that a good quality bicycle oil could be used on the brake shell if necessary. From this advice, I infer that it is okay to substitute a different type of grease into the brake band and will use Molybdenum high temperature grease made by Comma. It looks very like the grease that Sachs used in the next generation of Duomatic. Besides, this grease only has the crude function of preventing the brake grabbing.
| First, build up the sub-assemblies starting with the planet carrier. The photo shows the bearing track greased ready for … |  |
| …fitting the large ball bearing ring with the closed end downwards onto the planet carrier as shown. Put more grease (ordinary lithium will do fine) on the balls after fitting. |  |
| Put on the large check washer. |  |
| Put the planets into position and push their axles in. |  |
| You can lubricate as you go with oil if you like. I waited until the end for the sake of clarity. Oil will find it’s way everywhere in the hub in a short time. |  |
| A good oil to use with hubs is four-stroke motor mower oil, which has a much more arduous life in a mower than it ever would in a hub gear. It is a suitably light viscosity, and non-foaming. |  |
| Re-assemble the pawl carrier with its two sets of pawls and large friction spring. The four pawls are identical but clearly they must be the correct way in the carrier. The rounded bulging side must go closest to the carrier with the slot on the pawl on the outside. |  |
| Fit the first pawl in the position shown… |  |
| … and the second opposite and push the round spring over and into the groove.The carrier must look exactly like this at this stage, i.e. looking at the plain end, the closest set of pawls should engage anti-clockwise. |  |
| Now fit the second pair of pawls in the other groves and ‘catching’ in the opposite direction. Note that I did not remove the friction spring on the pawl carrier. |  |
| Clean the axle and check for damage. |  |
| Fit the fixed cone, put the axle in the vice and screw on the locknut belonging to that side. |  |
| Turn the axle over in the vice so that the cone and the sun gear are lower. |  |
| Put the planet carrier assembly onto the axle with the internal teeth upwards. Note that I greased the small ball bearing and put it in place on the cone first, rather than fix it into the carrier shell. I forgot the small bearing retainer ring. Do not make this trivial error. It will mean that you have to unscrew the locknut and take off the cone to tap the retainer ring in after assembly. |  |
| Now place the annulus over the planet carrier, rotating a little to engage the internal teeth with the planets. |  |
| Put the pawl carrier on to the axle with the friction spring pointing upwards. You may have to squeeze the pawls in to get the assembly in place within the annulus. |  |
| This is how it should look at this stage. You can put a little oil in but do not exceed a total oil content of around 2 teaspoonfuls, just enough to coat all the parts. Oil can be replenished through the hole in the shell. |  |
| Put the small thrust washer on the axle… |  |
| … followed by the drive bush. Push the bush into place, rotating it a little to get it to mesh with the internal teeth of the planet carrier. |  |
| When the drive bush is in position it should clear the small groove in the axle for the circlip. |  |
| Take the drive ring with the little collar downwards as shown… |  |
| … and drop it into place over the exposed pawls. If you rotate the ring you may see the pawls operating correctly. |  |
| Now take the circlip and push it into the groove in the axle. Press with a small piece of wood. |  |
| Build up the brake cone sub-assembly by fitting the pawls in a similar manner to the pawl carrier. |  |
| It should look as shown if you have done the job correctly. |  |
| If you took it off, re-fit the friction spring. This can go either way up as it is symmetrical. |  |
| It is very important to note that the hole in the brake cone should be fitted over the friction spring on the pawl carrier. |  |
| Move the friction spring as necessary to get it to align with the hole in the brake cone, then screw the cone down on to the drive bush. |  |
| It will look like this at this stage. |  |
| I had not been oiling as I went on, so at this stage a couple of teaspoons of oil was tipped into the mechanism, with care. Do not over oil. The outer parts of the mech were given a thin coat of oil. |  |
| The hub shell, in this case in a wheel, may now be slid over the assembled gear mechanism. Before doing this, look inside the hub shell and note that two teeth on opposite sides of the toothing on the hub shell are shorter than the others. This is the only place that will pass over the two projections on the drive ring. Try to align the mating parts as best as possible, then rotate the shell a little to get it to pass over the drive ring. | 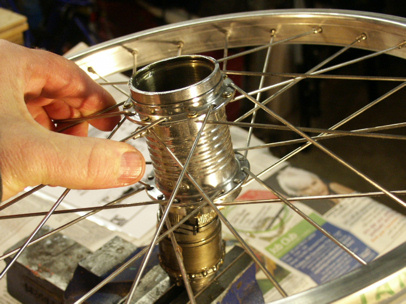 |
| View of shell in place on the hub mechanism. |  |
| Take the brake band with the wide end of the cone shape and cutouts down, and the lugs up, and apply molybdenum or CV grease to it generously. |  |
| Put the brake band into the hub so that the cutouts at the base engage with the friction spring ends sticking out of the brake cone. | 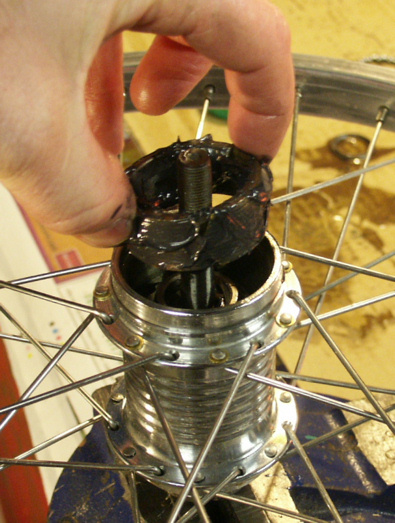 |
| Grease the large ball retainer ring and it’s track on the shell with CV or molybdenum grease and put the ring into place on the hub shell. Note that it will only rotate properly one way up, closed side outwards. |  |
| Fit the brake plate with the integral reaction arm on to the hub ensuring that the slots align with the projections in the brake band. | 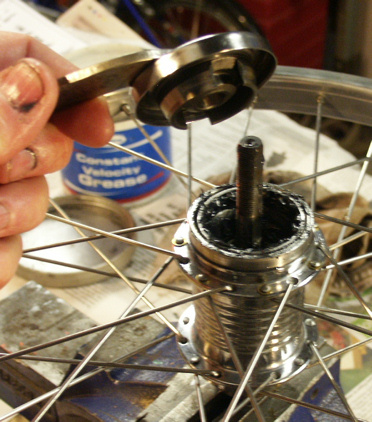 |
| Screw on the first locknut and tighten only finger tight. Place the thin anti-turn washer on the axle. |  |
| Screw on the second locknut, and tighten lightly at first. Check the wheel for both tightness and play, and adjust the cones if it seems too tight or too loose. Over tightness can be assessed by taking the wheel out of the vice and turning the driver (i.e. where the sprocket will be attached). When you are satisfied, tighten the second locknut fully and re-check the setting. Note that the brake reaction arm is not fixed on the Duomatic but may be swivelled into the desired position before clamping to the frame. |  |
| Finally, install the serrated washer and the axle nut. If you need to, remove the cone from the other end of the axle and fit the small bearing retainer into the driver. Then replace the cone and screw the locknut up tightly. |  |
Give yourself a pat on the back if your hub works!